
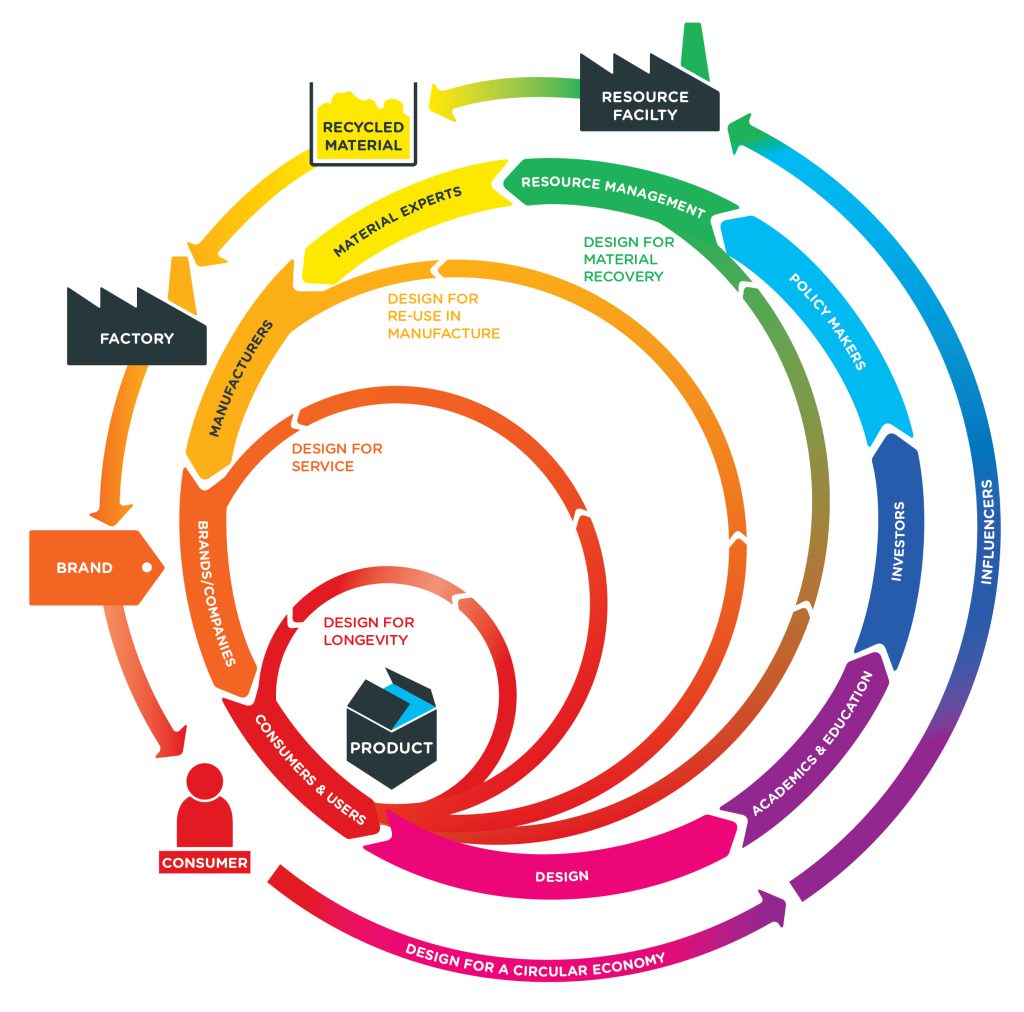
The RSA Great Recovery Project referred to in the previous section produced the schema above. I’ll let them describe it.
“Much of our thinking has evolved around the different paths a product can take in order to be designed for circularity. This thinking is expressed through the four models, or principle; Ideally we look to design as close to the user as possible on the inner loop – for longevity, but if that is not realistic or relevant to the product we move on to designing for a different business model: leasing or service. The next loop of re-manufacturing sees broken components replaced and the product restored to its original state, whilst the outer loop of material recovery (or recycling) involves the complete breakdown of materials before some are restored to the manufacturing process.”
The implications include:
By the time something is sat on the table in front of us needing a repair, we have to take the designer’s input as read, though the experience gained from repairing our things may inform what we buy in future. Here I want to focus on the repair process.
So back to the immediate task; if a thing needs mending, you will need to go through something like the following steps
Let’s go through these steps
Sometimes it is obvious what is wrong and why it is wrong, so you can skip this bit. On other occasions it is obvious what is wrong, but not why, and this is where you need some information. There are a number of issues here (some of which are beginning to be addressed – see the initiatives section), including
Set against that, we have the internet, and as you can see from the repair log and resources section, the number of times that you can find someone somewhere who has been good enough to post or put up a You Tube video is amazing. OK, sometimes it is the wrong model, or person doesn’t quite know their stuff. That can be hard to detect if you don’t know either. But it is a fantastic resource.
Remember though that assumption is the mother of all mistakes, and if you go in with wrong assumptions, you may come out with a wrong diagnosis. When mending things you need to accept that sometimes you will misdiagnose and spend time and money on the wrong things. Call it a learning opportunity…….
OK, so armed with a diagnosis, now you need to assess the viability of repair, and crucially who is going to do it.
If something is in warranty, it will almost always go to someone else for repair, so that’s easy, unless the costs of return exceed the cost of the item.
If it is not in warranty, for the purposes of this assessment you can ignore pretty much all the return to authorised service centre/qualified person stuff. Instead what you need is
This is where you need a good dollop of self-knowledge. For example, I wouldn’t recommend anyone to mess with gas appliances or fridges/freezers on the basis of what they can learn on YouTube. That really is stuff for people with the right qualifications and equipment.
The decision to do it yourself or to get someone in is central to whether the job makes sense or not. In money terms it will often make the difference between the job being worth it and not. Sometimes a job can only be justified on the basis of the learning it provides or because you are attached to the item in question. Again I’ve put up examples of success and failure in my log.
If you do go ahead yourself, get decent tools. Particularly to start with avoid the “all the tools you’ll need” sets. Most are rubbish, many remain unused. Avoid gizmos, “this is the only spanner you’ll ever need” kind of stuff, and get good simple tools. Thankfully with tools you tend to get what you pay for.
In the absence of repair manuals for most things, the internet steps in for procedures, tools and techniques. Try to get guidance as near as possible for your item.
Even if you don’t do the job yourself, it may fall to you the get the parts in. The most basic issue is whether you can get any parts at all which are applicable to your task/model. Sometimes you have to buy a big sub assembly instead of just the part you want which is really irritating and can render the repair task uneconomic.
Another aspect is what kind of parts they are
So this is a good moment to see if the task is a worthwhile proposition in terms of money and time. Or does the benefit come from what you learn, or just having the item back?
By the way if it is the first time you have done such a task yourself – get a few more parts than you need so mistakes don’t bring the whole process to a halt.
I’m now assuming that it is you undertaking the task. Here are some thoughts on that.
First off is safety
I list a number of safety related lists in the resources section. They often derive from bitter experience. Do take care.
When doing the actual job, the main thing is not to worry about the time it takes. You aren’t doing this as a commercial venture so for the most part (I can think of exceptions) you can take your time.
And you will need it. Go carefully and slowly, taking lots of pictures however obvious it may seem. Label stuff, use parts bins, refer back to the person on YouTube. Maybe even read the manual or instructions!
Check and think before breaking things or making the job bigger than it needs to be. For example if a part is stuck, does it really need to come off, or is there a work-around?
Tea and biscuits are a great help.
On to the task itself. Ideally if there is a difficult technique involved, do a practice run. Or two or three. That’s why you got some extra material or parts.
To some extent, this is the easy bit.
Keep all the old bits until you have checked and tested the item. Sometimes you can inadvertently throw away a small part like a washer or spacer or button.
If you have been using parts bins, have you used all the parts up? Can you explain why there is a screw/zip/cable left over? If not – go round again and check.
Hopefully all is good, but you may still need to temper your enthusiasm and joy for a moment. Particularly for electrical items do initial checks very carefully. It is a good idea to get them at least PAT tested to ensure they aren’t live. Having a qualified person to look over your work is better than many other alternative outcomes. The same is true for hydraulic or fuel systems on cars.
It may be the finished job doesn’t look as good as you might have hoped. There are two possible causes. The first I call “wallpaper syndrome”. If you have just papered a room all you can see are the mistakes. All everyone else can see is a newly decorated room which looks great. So be wary of being too self critical having spent a good deal of time right up close to the job; it may not matter.
The other thing is that you might view the task as a stepping stone to develop skills, in which case you need to assess it as a first go rather than a finished item.
Finally after all the effort and money it may be the thing still won’t work. Well you may have to go round again (perhaps your initial diagnosis was wrong?) or give up having tried your best. In any event you will have learnt from the experience.
But if it is a success, what satisfaction!